Blanket One: The End of a Cursed Project
When I started my work on the Big Granny Square Blanket, I said it was easy. Simple. No problem, it's just a granny square! Ha, ha - Life had different plans for this one. From tangled skeins and evil trolls to dead batteries and the loss of my internet service, it seems like some unseen force has fought the process of creating and sharing both of these blankets. But I have fought it back.
Dispite my troubles, this is an easy project for experienced crocheters. An "evil troll" hasn't been the real problem; it's more like forces of nature and lack of sleep. With the time spent pulling out stitches, I could have taken a nap. But since I can't sleep, I crochet. Through thunderstorms and a perpetual state of exhaustion fueled by coffee and heavy metal, I have stitched, and stitched, and stitched. And ripped, and ripped, and ripped, too... Finally, I've made it right, and both blankets are ready for the World's Biggest Stocking. After the stormy weather knocked out my internet for a few days, I was put behind again. So, sorry for the delay! Better late than never, right?

Get ready for a Grande Finale of posts in honor of the end of the project! First, we'll work through a few more colors. Then, look for another tutorial for beginners - How to weave in your ends. Along with the rest of the rounds, I've thrown in a little "tip", too. I wouldn't call it a tutorial, really, but look for the link to the full tutorial if you need it! In this post, we'll begin with Aran, then work through the rest of the rounds to complete the project. If you missed the post ending with Fresh Green, click here to get caught up.
-P.S. Although you can make a blanket with any yarn you may have, use Caron United if you can (but beware of trolls). Fifteen cents goes to the Children of Fallen Patriots Foundation for each skein you buy. That's extra-cool.
 |
We're going to go through the rounds quickly to fit in the tutorial - The beginnings (ch 6, 3 dc, ch 1) and corners (3 dc, ch 3, 3 dc, ch 1) of the rounds are all worked the same. You've got this, right? Remember to ask for help if you need it!
In round 19, you will make (3 dc, ch 1) 17 times between corners. Remember to slip stitch in the beginning ch-3 corner to begin the next round.
In round 20, make (3 dc, ch 1) 18 times between corners. My finished measurement after both rounds is 26" (66 cm). |
 |
Following the pattern, the next color is Burgundy.
In round 21, you will make (3 dc, ch 1) 19 times between corners.
In round 22, (3 dc, ch 1) 20 times between each corner.
Remember, this is the count of sets between the corners, not counting the 3 double crochet that are created in each corner ch-3 space.
My finished size after these rounds is a little over 28" (71 cm). |
Okay, beginners - Here's that tutorial for you: How to weave in your ends! (This is my way. I've seen many ways. I like this one. But I still hate weaving in ends.) You may want to read ahead through all of the steps before you begin, to understand the stitch direction and how we will create "fake" stitches.
 |
| First of all, make sure you don't cut your yarn too short! I like to have a tail of at least 6" (15 cm), but usually cut it even longer at about 8" (20 cm). Leave slack in the stitch when you bind off. Don't pull tight! We're going to follow the direction of the stitches to hide the tail, and it will blend in perfectly when we're done. |
-
-
|
| Using this method, we will skip the next stitch, work into the following stitch, and bring it back around, then up - creating a "fake" stitch on top of the real stitch. |
 |
| Insert the needle from back to front in the following stitch. This is going to form the back loop of the fake stitch over the skipped stitch. |
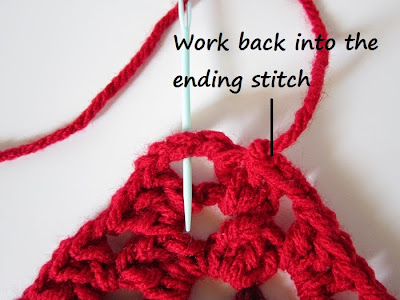 |
| The ending (last) stitch needs to be secured and joined to the stitch just made. If you analyze the top of a stitch, you will see that it forms a "V" shape, with the bottom point running into the center of the previous stitch. We need to work into the center of the ending stitch to create the front loop that will form the "V". |
 |
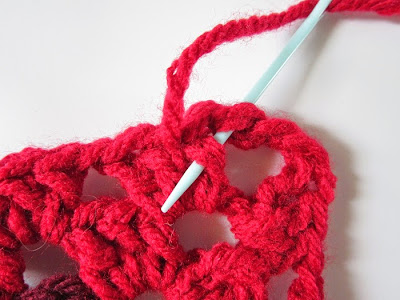
| Before you begin, read ahead for the next few steps. With attention and good eyes, you may be able to pick up more than one loop at a time. For this step (forming the front loop of the stitch): Insert the needle from the top, down through the center of the ending stitch. |
 |
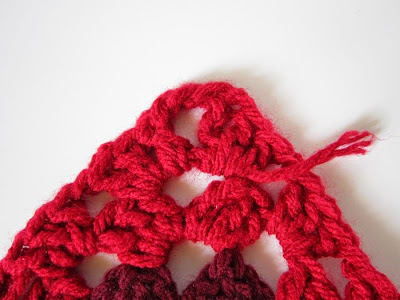
| I'm going to leave my stitches loose for the next steps, so you can differentiate between the stitch and the tail. You may want to pull your end snug as you work, so the loops don't get in your way. Don't pull them any tighter than the loops of the real stitches. |
 |
| The highlighted stitch is the skipped stitch. Check out the next few steps before proceeding, so you can get an idea of where you will be working. Then, you'll see what it looks like with the needle through the loops. |
 |
| The highlighted part of the stitch you see here is the loop that runs diagonally under the top loops of the stitch. After working through the center of the skipped stitch, you'll work through the center of this one. |
 |
| Here, you can see how you can run the needle right through the center of the skipped stitch and catch the center of the loop underneath at the same time. |
 |
| Once you pull the tail through, you will follow the bottom loop of the stitch up through the center of the skipped stitch. See next step for example. |
 |
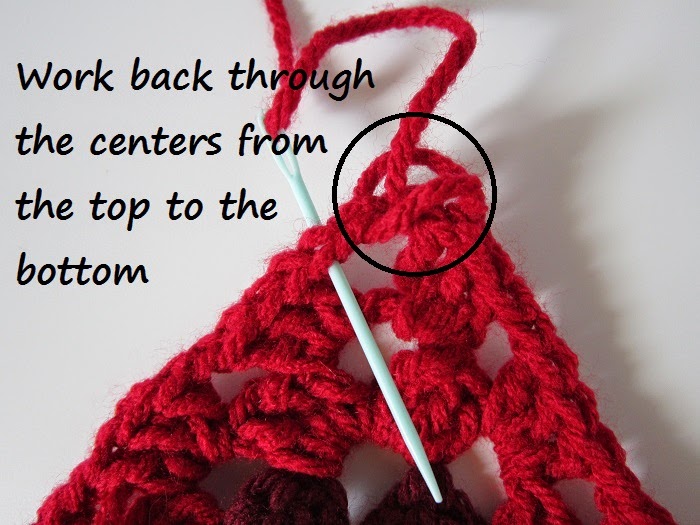
| From the bottom, run the needle through the centers of both the skipped stitch and the "fake stitch" that was made over it with the tail. See next step for top view. |
 |
| Looking down at the tops of the stitches, you should see your needle come through the center of both stitches. |
 |
| You will skip the next available stitch. In the next steps, we will make another "fake" stitch over this skipped stitch. |
 |
| Insert the needle from back to front in the following stitch. This is what will create the back loop of the "fake" stitch over the stitch we just skipped. |
 |
| Working into this stitch will create the front loop over the skipped stitch. See the next steps before proceeding for a better example of the loops. |
 |
| The tail is underneath the stitch here because I'm picking up my work. If you make a point to keep the tail above the stitch, it makes it less likely that you will work over it. |
 |
| Make sure you don't work over your tail! From top to bottom, run the needle through the centers of both the skipped stitch and the "fake stitch" created by the tail. |
 |
| Can you do the next one by yourself? Follow the bottom loop to run the needle through the center of the next stitch from bottom to top. Skip the next available stitch. Run the needle through the following stitch from back to front, then through the centers of the previous skipped and "fake" stitches. |
 |
| Here you can see the "fake stitches" that I've left loose. Before we proceed, I need to tighten my stitches to lengthen my tail. This method eats yarn quickly! If you also left your stitches loose and need to tighten them, begin with the first stitch made. Pull the front loop to tighten the stitch, then pull the back loop of the next stitch to pull the slack from this one. Beginning with the back loop of the next one, continue for the remaining stitches. |
 |
| Now, we will work out of the corner chain and into the first set of double crochet. Following the bottom loop of the stitch, run the needle through the center of the next stitch from bottom to top. |
 |
| As for the previous steps, you will skip the next stitch and run through the following stitch from back to front. Here's what it will look like on the needle when you perform the previous step and this step in the same motion. (Up through the center, skip next stitch, run through the following from back to front.) |
 |
| Work through the center of the previous skipped and "fake" stitches. At the same time, follow the bottom loop of the stitch to where it runs through the post (the diagonal loop under the top loop). |
 |
| This is where I follow the base loop of the stitch, then work into the chain underneath the base of the double crochet. Work into the chain from top to bottom, then through the base loops of the next double crochet. Repeat in the same direction each time, so you know you're not undoing the stitch just made. Continue to the end of the set of double crochet. |
 |
| Turning around, I work in the same method, inserting the needle from the bottom through the tops of the chains, so I know I'm working against the stitches just made. |
 |
| Continue working through the next set of double crochet in the same manner. Work through more stitches if you like, but I trim the end here. There's over six inches (15 cm) of tail woven in there! |
Here's where I have to apologize again: After all those photos for this tutorial, I killed my camera battery. Without thinking, I worked ahead while it charged, and forgot to take a finished photo of the rounds of Cherry. In round Round 23, you will make (3 dc, ch 1) 21 times between each corner; 22 times in round 24. (Remember, that's not counting the corners!) My finished size after these two rounds is about 31" (79 cm).
And now, for your tip! Making two blankets at the same time, I ran out of yarn halfway through the second round of this color, and had to begin a new skein. Weave in more ends? No! Make a Russian Join! Because of my hands, I often have trouble holding a shorter needle, but I can easily hold a longer hook. I decided I'd share my way of getting around this, since I'm sure I'm not alone with this problem. Some yarns are no problem; the needle settles easily between each ply of the yarn, and I can push it through with one finger if I want to. Other yarns, like Caron United, have a springy texture that causes the separate strands to jump off the needle if you move the slightest bit in the wrong direction. You have to hang on to the needle with one hand, and hold tight to the yarn with the other. I often lose my grip, and have to begin again.
For a true step by step tutorial on the Russian Join, you can check out the original here on the blog, complete with horrible background (don't know what I was thinking, there). Or, give my newer Guidecentral guide a try! The pictures in the guide are a little dark, but they're much closer, and at least the background won't burn your eyeballs out.
 |
| Here, I've already created the loop in the first strand of yarn, and I'm joining the second skein. It's a bit tricky to use a hook at first, because you work in the opposite direction. I double the yarn over where I will create the loop to judge where to insert the hook in the strand. |
 |
| Using a small steel hook allows me enough room to insert the needle against it, but I usually skip the needle and just use the hook. My hands get in the way too much to take a photo like this, so I've used the needle this time. This still helps me, because I can use the hook for leverage and as a guide for the needle. Using a needle alone, I often weave halfway through the yarn, just to lose my grip and have all the strands pop off. |
 |
| Here you can see what it will look like before you pull the tails tight. Kinda messy, right? It's hard to believe this will blend in! |
 |
| I untwist the ply after pulling the ends tight, give it another gentle tug, and re-twist them a little tighter than they should be. Two times of doing this blends in the tails, and all you'll notice is a spot where the yarn feels a bit thicker. Once it's worked up, you can barely tell the difference. Time to trim the ends and keep working! |
By the way, if you're asking why you should start a new skein this way, here's my reason: Time spent weaving the tail of a new skein into a project - 10 minutes. Time spent on the Russian Join - 1 minute, 30 seconds. Maybe you're a master end-weaver and it only takes you seconds to get rid of that tail. I think it takes me longer because I'm busy grumbling about how much I hate weaving in ends.
 |
In round 25, make (3 dc, ch 1) 23 times between each corner.
In round 26, make (3 dc, ch 1) 24 times between corners.
The finished size with these two rounds is 34" (86 cm)... I'm grumbling again because I still have to weave in the beginning and ending tails, but at least that Russian Join saved me from having to do more! Almost done! |
 |
No Russian Join this time - I knew I needed to start a new skein before beginning this color. After the first cursed skein of Fresh Green, I fear this color...
So far, no yarn vomit. No extra strands caught in the ply. It's been a perfectly normal skein through the end of the project. Not even the slightest tug on the yarn. Have I worked through the "curse"? |
 |
In round 27, you will make (3 dc, ch 1) 25 times between each corner.
In round 28, make (3 dc, ch 1) 26 times between corners.
My finished size here is 36" (91.5 cm) - What a sigh of relief when I realized I was finally finished! ...Well, almost. I had to weave in the ends from these two rounds. Then I was done. |
 |
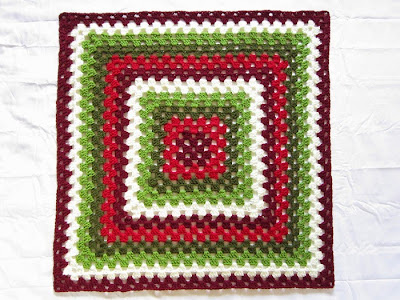
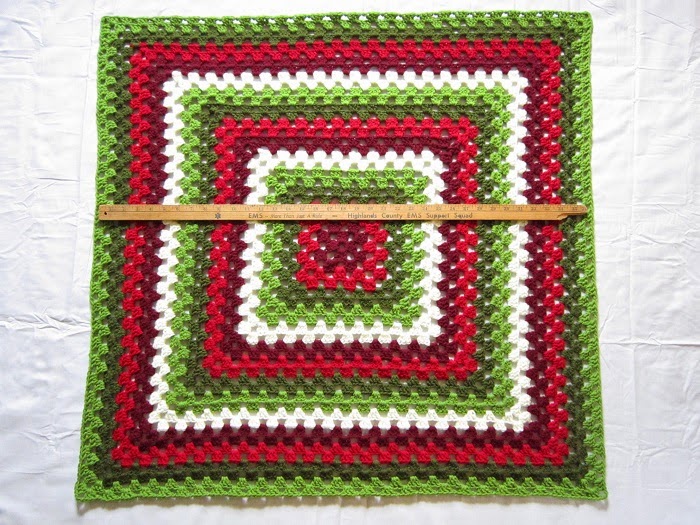
| There it is, folks - Two blankets finished and ready for the World's Biggest Stocking! One is worked completely in the round, and the other is turned every color change. Personally, I like the turned version. I think I have "texture ADHD". If a project stays the same for too long, I get bored with it. |
I must admit some disappointment: I really like the contrast of the Aran against the darker colors, and I was kind of hoping to end with that. Plus, it's weird, but I swear the skeins of Aran are softer than the other colors. Is that possible, or is it my imagination? Hmm... Can some yarn guru tell me if the dyeing process can change the texture of the yarn, depending on color?
As for wanting to end with Aran - Oh, well. Lighter colors don't always make for the best borders when you have kids or pets; believe me, I know. That's called "life". Kids will inevitably wipe dirty hands/snot/who-knows-what on the edges of anything! And as much as I love my dog, I don't love his slobber. If I don't hide my pillows and fold up my throws when not in use, he uses the corners to clean up his face after flooding the floor getting a drink. Maybe stain-hiding darker colors are better for edges. I'm sure some of these blankets will make it to kid/pet households, and I know I'm not the only one out there with mess-making family members.
I'll be moving on to more blankets soon. I still have a free pattern in the works, and maybe we should have a Yarn Tales Tuesday, too. Until then, I'll have to decide which one to make next!
The end... Of this one!
Links to posts you may have missed:
Happy Crocheting!


Comments
Post a Comment
This is not a political website. Any comments with political content will be removed. Y'all need to learn how to act right.