It's finally here! This tutorial has been horribly delayed. I can't say much other than I'm sorry. Life kinda gets in the way of crochet sometimes, so hopefully you can forgive me.
I know that the most complaints are about the sc3tog in the border, but I'm including a partial tutorial for the body, too. I'll show you how to begin it in this post. After helping a fellow crocheter figure out the border, we discovered that his stitch count was off because of a few missed stitches in the body - That's okay, it happens! If you just need help with the border, follow the links to find the tutorial you need! (Found at the end of this post.)
Before we begin, I would like to note that I'll be using a smaller hook size in the tutorial. The original pattern calls for a size I/9-5.50MM hook, but I wanted to use a smaller hook this time, to see if it makes a better dishcloth. Gauge isn't too important for this pattern, but mine seemed to come out looking a little short with the smaller hook - maybe it was just my tension. FYI: The smaller hook
did make the finished pattern slightly stiffer and scrubbier. It's still too pretty to use for dishes. Anyway, let's get to it!
Clicking here will open the original pattern in a new window
 |
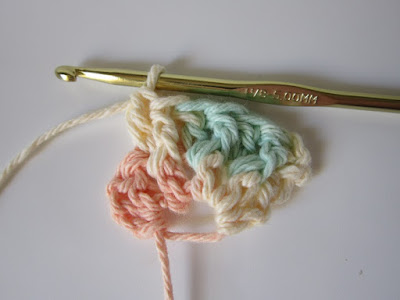
| The pattern begins with a magic circle. Chain (ch) 3 to count as the first double crochet (dc), then make 5 more dc in the circle. If you don't like beginning with a magic circle, you can also begin with a slipknot, chain 3, then make the 5 dc in the farthest chain from the hook. |
 |
| For row 2: Chain 3 and turn. The next stitch will be a front post dc (fpdc). Insert hook from front to back to front again under the post of the next stitch. Complete the stitch as for a dc. |
 |
| Here's that trouble stitch: The next stitch (dc) is made in the top of the same stitch as the front-post stitch. To find the space, you may need to pull the post stitch to the side or down a bit. |
 |
| Once you insert the hook to make the next stitch, the post stitch will fall in front of your hook. It's a little annoying to make the first few of these stitches, but once you do it a couple times, you'll be shoving that stitch out of the way and working on with no trouble. |
 |
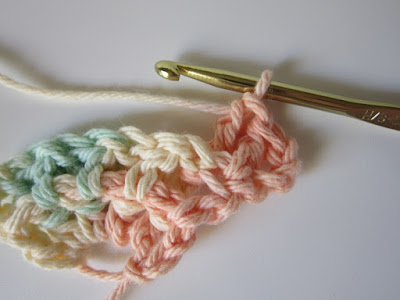
| The completed stitch will look like this. The front-post stitch will jog downwards between the two dc. |
 |
| Make (1 front-post dc and 1 dc in the same stitch) two more times to complete the pattern repeat. You will now have a total of seven dc in the row. |
 |
| Complete Row 2 with a fpdc in the next stitch, and a dc in the last. The turning chain is hard to find after that post-stitch; make sure you don't miss it! |
 |
| Row 3 begins with ch 3 for the first dc, and one dc in the same stitch for an increase. |
 |
| The next stitch will be a back-post dc (bpdc). Insert the hook from back to front in the space before the next stitch. |
 |
| Insert the hook from front to back in the space after the stitch. |
 |
| Complete the stitch as for a dc. This stitch begins the pattern repeat in parenthesis ( ). |
 |
| Make 1 dc in the next stitch. (No post stitches to move out of the way in return rows!) This completes the first set in ( ). |
 |
| Repeat (1 bpdc, 1 dc in next) 3 more times, ending in the turning chain. There will be 10 dc in the row at this point. |
 |
| Make 1 dc in the same stitch as the last to complete the row. |
Unless you want a 1,000 picture tutorial (lol, not really, but close enough), it's time to move on. Each row with front-post stitches will have a dc after the post stitch, but make sure you don't make an extra stitch after the last fpdc. Each row with back-post stitches will have increases in the beginning and ending stitches. Watch your stitch count! We'll be skipping ahead to the last row of the body in the next tutorial.
-Or, skip to the tutorial you need:
Part Five - Border - The beginning of round 2 up to the first sc3tog
Part Six - Border - Finishing the pattern!
Happy Crocheting!


Comments
Post a Comment
This is not a political website. Any comments with political content will be removed. Y'all need to learn how to act right.