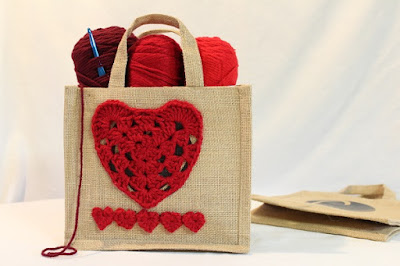
For this month's Granny-Spiration Challenge, there was one thing set in my mind: Hearts! But once I started experimenting with granny hearts, I was a little lost as to what I should do with them. As I sat there thinking, my eyes came to rest on the small tote bags I've been using to store small projects.
Our dentist gives patients these burlap bags stuffed with a few goodies - and with their logo and website plastered on the side. They do make really good bags for small on-the-go projects, but I'm not fond of toting my work around in a bag that screams "hey, I just had a tooth pulled!". I've had the idea to cover it up with something, but I couldn't decide what to use... Until I decided to use my granny heart to make a bag that shows how much I "heart" crochet!
Hot glue came to the rescue and made this an easy no-sew project for me. The small hearts I used to cover the website lettering are from a pattern I originally published on Guidecentral. I'll re-publish it here in a few days and update with a link. For now, let's get to the pattern for the granny heart!
Skill level:
Easy
Materials:
Worsted weight (4) acrylic yarn
-I used Caron United in Cherry
Crochet hook size J/10 - 6.00 mm
Tote bag with cheesy logo that needs covered up
Hot glue, fabric glue, or -if you so choose- a needle and thread
Gauge:
As pattern is worked, 3 rounds = 4" x 4" (10 cm x 10 cm)
Notes:
Chain-1 at beginning of rounds does not count as a stitch
Single crochet stitch at ends of rounds counts as a chain-1 space
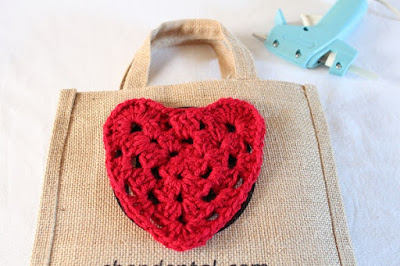
The heart that is already glued to the bag is stretched to fit - Check out the photo after the pattern to see what it looked like before I glued it on!
Stitches:
(American terms)
Chain
Single crochet (for joining)
Double crochet
Instructions:
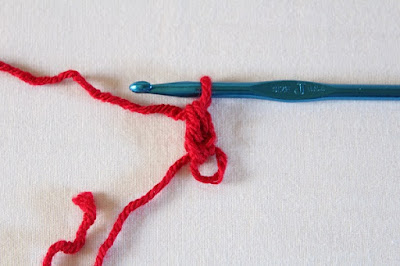
*I've started beginning my granny patterns by chaining 1, and working into the beginning loop. Some find this difficult, so you can begin with a magic circle/chain-1, or chain 3-5 stitches and join into a loop, then chain 1.
Round 1:
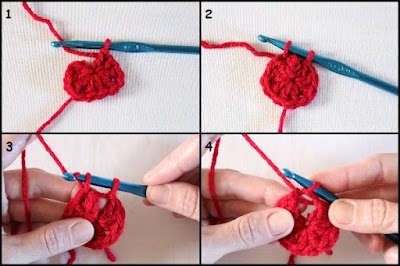
Chain 1. Make (3 double crochet, 1 chain) 2x in beginning loop. (2 granny stitches) Make 3 double crochet, join to beginning double crochet with a single crochet stitch (Makes chain-1 space).
*See what joining with that single crochet does? You can start working from the middle of the "chain space" to make the first half of your corner space! All remaining rounds will begin this way.
Round 2:
Chain 1. Make 3 double crochet in the single crochet joining space. [Chain 1. (3 double crochet, 1 chain , 3 double crochet) in the next chain-1] 2x. Chain 1, make 3 double crochet in the single crochet joining space. Join to the beginning double crochet with a single crochet stitch.
Round 3:
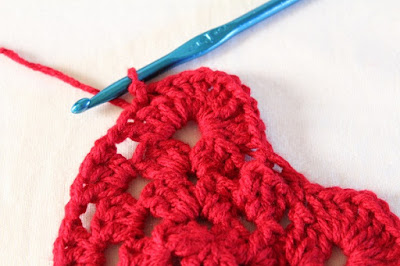
Chain 1. Make 3 double crochet in the single crochet joining space. [Chain 1. Make 3 double crochet in the next chain-1 space. (3 double crochet, 1 chain, 3 double crochet) in the corner chain-1 space.] 2x. (Chain 1, 3 double crochet in the next chain-1) x2. Join to the beginning double crochet with a single crochet stitch.
*It's almost there! Time to turn this triangle into a heart.
Round 5:
Chain 1. Make 3 double crochet in the single crochet joining space. Chain 1. (3 double crochet in the next chain-1 space, chain 1) 2x. (3 double crochet, 1 chain, 3 double crochet) in the corner space. Chain 1. (3 double crochet in the next space, chain 1) 2x. Chain 1. (3 double crochet, chain 1) 3x in the next corner. Make 1 double crochet in each of the next 2 chain-1 spaces. (3 double crochet, chain 1) 2x in the single crochet joining space. Join with a slip stitch to the beginning double crochet.
Bind off, and weave in the ends -if needed. Since I'm using hot glue to attach my heart to my bag, I'm not weaving in any ends! Well, okay... I had to pull the end tail back through the final stitch to bind off evenly, and then I had to pull it to the back. But after that, I just cut the tails short so they can be hidden behind the applique and secured with some glue.
Like I mentioned in the notes, I had to stretch the heart to fit over the logo - But not much at all!
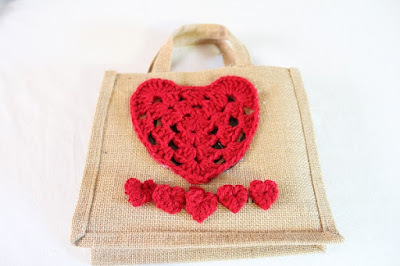
I still had that website lettering to cover, so I went to my old simple pattern for confetti hearts... But I made it in worsted, so they didn't some out like confetti! Each is about 1" (2.5 cm) across.
And once you pull the center tail tight, they become puffy little hearts. So cool! What's even cooler is still not having to weave in ends. I cut these short just like with the big heart:
It only took about five minutes to glue it all down. I started with the center of the big heart so I would have room to stretch it. Then I worked outwards toward the bottom where it needed the most stretching, and finished with the top.
(I hadn't glued the little hearts yet when I took this pic)
Only one minor hot glue accident later, I have a cute tote to display my love of crochet! I used the tip of the glue gun to clean up the mess of glue on the sides of the heart... And learned that acrylic yarn will stick/melt to the tip of the gun. Oops! So, I had some smoothing out to do, and then it was done.
Our dentist gives patients these burlap bags stuffed with a few goodies - and with their logo and website plastered on the side. They do make really good bags for small on-the-go projects, but I'm not fond of toting my work around in a bag that screams "hey, I just had a tooth pulled!". I've had the idea to cover it up with something, but I couldn't decide what to use... Until I decided to use my granny heart to make a bag that shows how much I "heart" crochet!
Hot glue came to the rescue and made this an easy no-sew project for me. The small hearts I used to cover the website lettering are from a pattern I originally published on Guidecentral. I'll re-publish it here in a few days and update with a link. For now, let's get to the pattern for the granny heart!
Skill level:
Easy
Materials:
Worsted weight (4) acrylic yarn
-I used Caron United in Cherry
Crochet hook size J/10 - 6.00 mm
Tote bag with cheesy logo that needs covered up
Hot glue, fabric glue, or -if you so choose- a needle and thread
Gauge:
As pattern is worked, 3 rounds = 4" x 4" (10 cm x 10 cm)
Notes:
Chain-1 at beginning of rounds does not count as a stitch
Single crochet stitch at ends of rounds counts as a chain-1 space
The heart that is already glued to the bag is stretched to fit - Check out the photo after the pattern to see what it looked like before I glued it on!
Stitches:
(American terms)
Chain
Single crochet (for joining)
Double crochet
Instructions:
*I've started beginning my granny patterns by chaining 1, and working into the beginning loop. Some find this difficult, so you can begin with a magic circle/chain-1, or chain 3-5 stitches and join into a loop, then chain 1.
Round 1:
Chain 1. Make (3 double crochet, 1 chain) 2x in beginning loop. (2 granny stitches) Make 3 double crochet, join to beginning double crochet with a single crochet stitch (Makes chain-1 space).
Round 2:
Chain 1. Make 3 double crochet in the single crochet joining space. [Chain 1. (3 double crochet, 1 chain , 3 double crochet) in the next chain-1] 2x. Chain 1, make 3 double crochet in the single crochet joining space. Join to the beginning double crochet with a single crochet stitch.
Round 3:
Chain 1. Make 3 double crochet in the single crochet joining space. [Chain 1. Make 3 double crochet in the next chain-1 space. (3 double crochet, 1 chain, 3 double crochet) in the corner chain-1 space.] 2x. (Chain 1, 3 double crochet in the next chain-1) x2. Join to the beginning double crochet with a single crochet stitch.
*It's almost there! Time to turn this triangle into a heart.
Round 5:
Chain 1. Make 3 double crochet in the single crochet joining space. Chain 1. (3 double crochet in the next chain-1 space, chain 1) 2x. (3 double crochet, 1 chain, 3 double crochet) in the corner space. Chain 1. (3 double crochet in the next space, chain 1) 2x. Chain 1. (3 double crochet, chain 1) 3x in the next corner. Make 1 double crochet in each of the next 2 chain-1 spaces. (3 double crochet, chain 1) 2x in the single crochet joining space. Join with a slip stitch to the beginning double crochet.
Bind off, and weave in the ends -if needed. Since I'm using hot glue to attach my heart to my bag, I'm not weaving in any ends! Well, okay... I had to pull the end tail back through the final stitch to bind off evenly, and then I had to pull it to the back. But after that, I just cut the tails short so they can be hidden behind the applique and secured with some glue.
Like I mentioned in the notes, I had to stretch the heart to fit over the logo - But not much at all!
I still had that website lettering to cover, so I went to my old simple pattern for confetti hearts... But I made it in worsted, so they didn't some out like confetti! Each is about 1" (2.5 cm) across.
And once you pull the center tail tight, they become puffy little hearts. So cool! What's even cooler is still not having to weave in ends. I cut these short just like with the big heart:
It only took about five minutes to glue it all down. I started with the center of the big heart so I would have room to stretch it. Then I worked outwards toward the bottom where it needed the most stretching, and finished with the top.
(I hadn't glued the little hearts yet when I took this pic)
Only one minor hot glue accident later, I have a cute tote to display my love of crochet! I used the tip of the glue gun to clean up the mess of glue on the sides of the heart... And learned that acrylic yarn will stick/melt to the tip of the gun. Oops! So, I had some smoothing out to do, and then it was done.
Happy Crocheting!







Comments
Post a Comment
This is not a political website. Any comments with political content will be removed. Y'all need to learn how to act right.