Part 1 of this tutorial showed you the pattern for the panels that make the top, gave you recommendations for size adjustments, and included some variations you can use to alter the shape. Here in Part 2, we will learn how to make the stitch for the seams that join the panels together. You'll also get some extra tips at the end when I show you where I made a mistake on my top. 😕
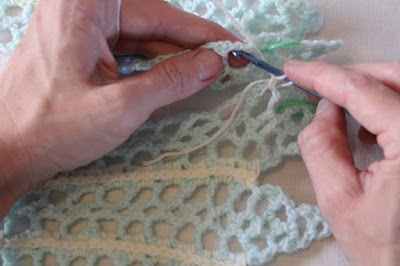
This loop will need to be "anchored" when you begin the stitch, so this is where it gets a little tricky for beginners: You'll need to hold the loop steady on your hook - and at the same time - You hold the tail against the space you'll work into. When you insert the hook in the space, bring the hook in front of the tail so it gets caught in the stitch.
Now, just like for a single crochet: Yarn over and pull up a loop. (2 loops on hook) The tail should be trapped between the hook and the stitch you worked into.
But unlike a single crochet, we won't complete the stitch. Yarn over.
Pull through only one loop. (2 loops on the hook)
Okay, now it's time to work into the next panel! Keep the working yarn behind the hook, and insert the hook into the opposite space.
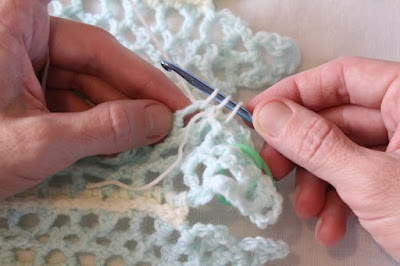
Yarn over and pull up a loop. (3 loops on hook)
Yarn over and pull through one loop. (3 loops on hook)
Time to make the pieces become one! Yarn over, and pull through all three loops on the hook.
Want to save some time? Here's where you can weave in your bottom tail as you work. bring that tail up and over your working yarn before making the next stitch.
For the height of the double crochet stitches I used in the panels, I made two joining stitches in each space... But that wasn't enough.
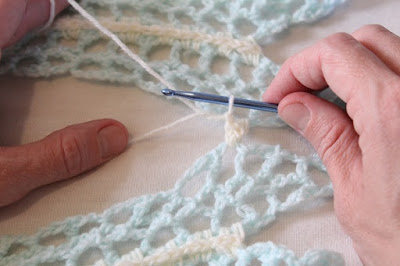
Because three joining stitches in a space made the seam puff up a bit, I added a chain space between rows. This is a great place to wrap the tail all the way around the working yarn (if you're working over it).
In each remaining space, make two single-crochet-two-together, then chain 1.
Don't chain-1 after the last stitch! Just bind off.
Here, I'm working the seam next to an armhole panel. The seam is worked in each space of the regular panel, but the remaining rows of the armhole panel are left un-worked. In the seam below that, you can see that two rows of the regular panel were left open where it joins to a shorter panel.
A little yarn wasted with the seam and extra panel made, but no endless frogging of a project worked in the round!
There's not much I can do about the extra panel, but I can reuse the yarn from the seam to rejoin the existing panels.
Until then...
Stitch:
Single crochet two together
Insert hook, yarn over, pull up a loop. Yarn over, pull through one loop on the hook.
(2 loops on hook)
Insert hook in the next space (on opposite panel), yarn over, pull up a loop. Yarn over, pull through one loop.
(3 loops on hook)
Yarn over, pull through all three loops on the hook.
How to join the panels:
- If you made the square-bottomed panel mentioned in Part 1, then you can begin joining in the bottom space of your panels.
- For pointy-bottomed panels like mine, skip the first four rows and begin in the fifth row.
- Make all seams in the same direction. Begin from the bottom and work up to the top of the panels, leaving any extra rows loose.
For the first joining stitch, I make what would be a standing-single-crochet-2-together. Whew, that sounds harder than it is! You can begin with a slipknot on the hook, join with a slip stitch, and chain 1 for the first stitch. But let me show you the way I do it, plus some time-saving tips:
Hold the tail behind the hook, and yarn over with the working end of the yarn. Bring the tail back in front of the working yarn under the hook. This makes the first loop of the stitch on your hook.
This loop will need to be "anchored" when you begin the stitch, so this is where it gets a little tricky for beginners: You'll need to hold the loop steady on your hook - and at the same time - You hold the tail against the space you'll work into. When you insert the hook in the space, bring the hook in front of the tail so it gets caught in the stitch.
Now, just like for a single crochet: Yarn over and pull up a loop. (2 loops on hook) The tail should be trapped between the hook and the stitch you worked into.
But unlike a single crochet, we won't complete the stitch. Yarn over.
Pull through only one loop. (2 loops on the hook)
Okay, now it's time to work into the next panel! Keep the working yarn behind the hook, and insert the hook into the opposite space.
Yarn over and pull up a loop. (3 loops on hook)
Yarn over and pull through one loop. (3 loops on hook)
Time to make the pieces become one! Yarn over, and pull through all three loops on the hook.
Want to save some time? Here's where you can weave in your bottom tail as you work. bring that tail up and over your working yarn before making the next stitch.
For the height of the double crochet stitches I used in the panels, I made two joining stitches in each space... But that wasn't enough.
Because three joining stitches in a space made the seam puff up a bit, I added a chain space between rows. This is a great place to wrap the tail all the way around the working yarn (if you're working over it).
In each remaining space, make two single-crochet-two-together, then chain 1.
Don't chain-1 after the last stitch! Just bind off.
Here, I'm working the seam next to an armhole panel. The seam is worked in each space of the regular panel, but the remaining rows of the armhole panel are left un-worked. In the seam below that, you can see that two rows of the regular panel were left open where it joins to a shorter panel.
We'll be working around those uneven spaces in the next part of the tutorial. Until then, there's a lot of joining to do! Before we close, let me show you where I ran into a problem with mine... You might find a great tip here:
I found myself having no problem while I was using myself as the template for my top... But in the middle of creation, my dummy (the dress form) finally arrived. I started using it to fit my top, and "thankfully" discovered that the back was just a little too small... So, I added a panel.
Now ready to assemble the final pieces! I pinned them together on the dummy one last time to make sure...
And after I joined the whole thing together, I realized that I had been a dummy. The dress form only goes down to a size small. I'm an extra-small. Maybe even an extra-extra small, if such a thing exists. (I exist, so I guess is does...)
Which is where I'll give you that golden tip: It's easy to frog around the tails if you worked over them the way I showed you... But leave your end tails out! I had started to "save time" by weaving in some of my ends... Like, across the whole back piece. As in, the part I now had to rip back.
Luckily (?), I have much practice in picking out my ends.
A little yarn wasted with the seam and extra panel made, but no endless frogging of a project worked in the round!
There's not much I can do about the extra panel, but I can reuse the yarn from the seam to rejoin the existing panels.
And hey! I even came up with another variation before I put it back together... The armhole seams ended up in a way that made me think crossed straps would be cute on this top:
Well, mine was in one piece again in no time! There's still just a tiny bit of extra room when I try it on, but we want it that way! Coming up in the next part of the tutorial, I'll show you how we'll clean up those edges around the uneven panels.
Until then...
Happy Crocheting!


Comments
Post a Comment
This is not a political website. Any comments with political content will be removed. Y'all need to learn how to act right.