First of all, let me point out, like I will multiple times throughout this post, that I lack embroidery skills. I'm not satisfied with the final result here. Seriously, once you scroll down a little bit, I bet you're going to laugh. But the crocheted part, and basic idea of the pattern still work out. Thread and a needle just don't work out for me. So, this pattern looks a little...off. But there's a point to this post! I decided to sacrifice my self-esteem, and show you my work as-is, so I can use it for an opening.
This is a less serious pattern than usual, and more of an example for what's soon to come on the Crochet is the Way blog. I'm not diving into the major details yet, this is just a cute, "look what you can do" kind of post. I had some problems, and also some fun creating this pattern, and I want this to be an "introduction" of sorts into the new series.
So what's coming? Design. I'll be working on tutorials for those of you who have always wanted to design your own patterns, but don't have the knowledge yet, or for those of you who are already designing, but need a little help. Although these how-to subjects will be geared more towards helping you create what you want, they will still include some patterns, as well as helpful tips for beginners. This pattern is a little piece of proof for the variety of what you can create once you learn skills like shaping, adding details, and joining pieces together. I'll be pointing out the problems I had while making Hashtag CatHeart (like accidentally creating #MouseHeart), so you can begin to pick up on a few issues.
But first, where did this pattern come from?

Question: "So, what is Hashtag CatHeart?"
Answer: "I don't know..."
This was a recent conversation with my kid. She's always coloring, doodling, and drawing, and she did this little character. Why? I don't know, and neither does she! I asked multiple questions using the "who, what when, where, why" format, and finally received the answer of "I just thought it up, and I like it".
So why all the drilling questions? I thought it was cute, and I wanted to use it. But, if I'm going to design a crochet pattern with it, I wanted to make sure it wasn't from a licensed product out of a TV show or video game. Nope! It just came out of my kid's wonderful brain. I asked her if I could crochet her design, and provide a free pattern, and she said "cool". That's "cool", because although I know some of you might be asking the same question about what in the world #CatHeart is supposed to be, many of you will agree how adorable it is.
I decided it would make a cute crocheted motif for an applique or some jewelry. I also decided to stop worrying and wondering what it's supposed to be, and just make it. Since the original designer can't explain it, I came up with the best answer: She's in that tween stage of finding herself through creation, and hashtags are a big source of comedy in our house. To explain why:
My other half isn't tech-savvy. He doesn't know the difference between an email and a text. He can't sign in to his email without help. If you tell him to type in a URL he says "Huh?", and he has absolutely NO clue what a hashtag (#) is, or what it's used for.
We still love him, though, because he helps me untangle yarn and makes pancakes for breakfast. Anyways, when the kid and I were having "obnoxious convo" time, we were making up funny hashtags. Every mother's top moment (not) in life: When their kid blurts out "Hashtag, I farted!" (Sorry.) Here comes the other half's famous question...
"What is a hashtag, anyways?" The kid quickly drew one, and he says "You mean a pound sign!?" So, now it's an ongoing argument (in fun) over whether it's a hashtag or a pound sign. I say let's play tic-tac-toe!
Where's the hashtag?
- Look for the bullet points after the main written pattern.

Skill Level:

Materials:
Size 10 crochet thread
-I used a combination of DMC Traditions in White for Color A, and Aunt Lydia's in Dark Royal for Color B. (Many other color combinations would work well, such as reverse blue and white, black and white, pink and white, or pink and black. Black and orange would be cute for Halloween.)
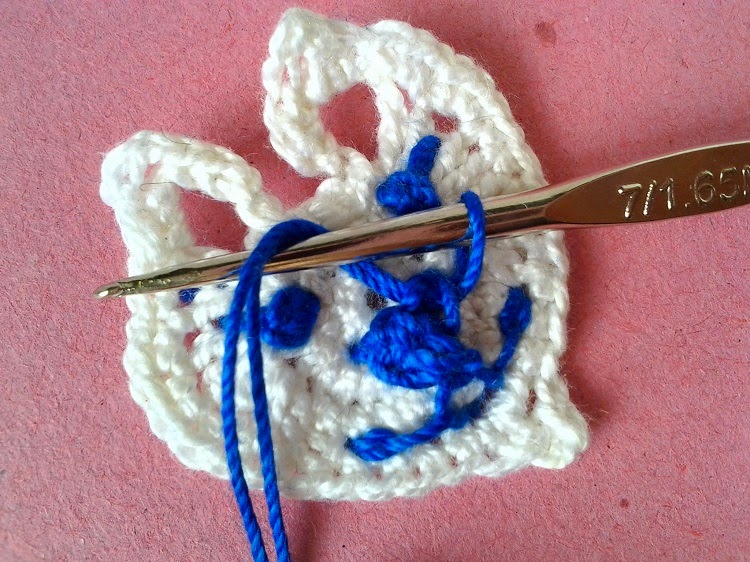
Steel crochet hook size 7/1.65MM or size needed to obtain gauge
Smaller hook to weave in ends
Tapestry or yarn needle
Gauge:
First 2 rounds of pattern (24 single crochet) measures 1/2" (1.25 cm) in diameter

Notes:
Many techniques can be used to create the facial details for this pattern.You may chose to use surface crochet, or your own embroidery techniques.
Sew-on eyes, beads, or felt pieces could also be added to create the facial details. Use your imagination, and create this pattern from your own mind's eye!
Stitches and abbreviations:
Magic circle
Chain (ch)
Slip stitch (sl st)
Single crochet (sc)
Half-double crochet (hdc)
Double crochet (dc)
Single crochet two together (sc2tog) - Insert hook, pull up a loop. Yarn over, pull through one loop (2 loops on hook). Insert hook in next stitch, pull up a loop (3 loops on hook). Yarn over, pull through all 3 loops.
Single crochet cluster (sc cl) - (Insert hook, pull up a loop. Yarn over, pull through one loop) twice. Insert hook, pull up a loop, pull through all 4 loops. - Also see pictures under the Nose instructions.
Picot tip for sc cl - Chain 2, slip stitch in top of sc cl made.
Beginning (beg)
Space (sp)
Directions:
Begin with Color A, make a Magic circle.
Round 1:
Ch 1 (counts as 1 sc), make 11 sc in circle. Tighten circle, join with a sl st to beg ch-1. (12 sc)
Round 2:
Ch 1 (counts as 1 sc), 1 sc in same st. Make 2 sc in each of the remaining 11 sc. Join with a sl st to beg ch-1. (24 sc)
Round 3:
Ch 6, 2 dc in same st. 2 dc in the next st. 2 hdc in the following st, 1 hdc in each of the next 2 sts. 1 sc in the next st, sc2tog twice. Ch 3, sc2tog twice, 1 sc in the following st. 1 hdc in each of the next 2 sts, 2 hdc in the following. 2 dc in the next st, ( 2 dc, ch 6, sl st) in the following st. Sl st in each of the remaining 4 sts.
Round 4:
Sl st in the ch-6 sp, ch 1. (2 sc, ch 3, sc cl) in same sp. 2 sc in each of the next 3 sts. 1 sc in each of the following 8 sts. Sc cl in ch-3 sp, make picot in top. 1 sc in each of the next 8 sts, 2 sc in each of the following 3 sts. (Sc cl, ch 3, 2 sc, ch 1, sl st) in ch-6 sp.
Bind off, weave in ends.

- Here's an example of how you can "fudge" a mistake in a pattern. Let me be clear about something first: I don't like "fudging" anything. I prefer to rip out my stitches and correct the mistake. But sometimes, you can get away with it. On this motif, I missed one half-double crochet in Round 3, which left me one stitch short in Round 4. Although any experienced crocheter would spot my "fix", the shape of the pattern still came out the same. Because Round 4 (before the chain-space) ends with "2 single crochet in each of the next 3 stitches", and I'm one stitch short, I divided it out to "3 sc in each of the next 2". For a more intricate pattern or a garment, the stitch count should be corrected in Round 3. But, since this motif was only to practice adding the facial details, I let it go. In the new series, we will cover how to find and fix your mistakes, as well as use the same skills to change existing patterns. This section of the tutorials will be geared more towards beginners, but can also be helpful to designers.
Adding facial details:
As stated in the Notes, you can chose to add facial details any way you want, but here are the instructions for the way I put it all together. Just an additional note: My embroidery skills s-u-c-k. I'm sorry. No, I don't mean I apologize, I mean I have some sorry embroidery skills, and I need to learn to do a better job. But at least I try.
Eyes:
Create each eye over the 3rd and 21st single crochet post of row 2 with Color B.
(For MouseHeart, make each eye with a French Knot.)
- I actually learned surface crochet because my embroidery skills are so terrible. Throughout the new series, we will be learning how to use surface crochet to add details and shaping where you might lack or maybe just dislike certain skills...My problem here is both. So...This is #MouseHeart. He/she wasn't meant to be, but happened anyways. Because of my horrible embroidery skills, and lack of thought. This is my attempt with a needle and thread, the French Knot, and what I think is called the Loop stitch. Even though I pretty much messed up the rest of it as a cat, the biggest problem here was the round eyes. After making my best attempt at a French Knot, I still couldn't figure out why I just wasn't seeing a cat. I see a mouse. Because cats' eyes are slanted, not round! (And I need to learn embroidery!) This makes a lesson on why to plan a pattern based on your skills. I know I suck at embroidery, and I probably should have just purchased some sew-on eyes or used beads instead. And once I figured out the problem with the shape, I felt a little dumb. But like I said, at least I try...And now we have a cute little mouse motif to go with #CatHeart! But, I don't know...My other half calls it a Cat/MouseHeart. Maybe it's just a total fail.

- #MouseHeart is a great example of another part of the series: Making multiple things from the same pattern. If you plan to make original design pieces to sell, it helps to have a "pattern base" for some basic patterns. Along with cat and mouse, using the main heart pattern, different colors, (and better embroidery skills), I could borrow the pattern for this base to create a dog, a fox, maybe a rabbit, and probably some other animals. In addition to that, this simple motif could be used as an applique, or for jewelry, magnets, key chains, etc.
For #CatHeart:
Thread a needle with a single strand of Color B. Bring the thread up from behind the work.

Insert the needle on the other side of the post, leaving slack in the loop.

Bring the needle back up through the beginning post space and through one strand of the loop.

Run the needle back through the second post space again.

Bring the needle back through the beginning post space, and under the other strand.

Find the post space between sets of (2 dc) in the next round, insert the needle.

Pull the thread through, secure with a knot at the back.

And repeat for the second eye.

Nose:
The tails of the nose will also create the mouth. Leave a tail of at least 8" (20 cm) on each end of the motif.
- The way the nose is attached is actually an example of what not to do when designing for sale items. But, if you're designing a pattern for your own use, and you know the back will be covered, then make a thread mess on the opposite side if you like! I made a mess of mine, well, because I have no choice (you know, because my embroidery sucks...), but also because I want to sew another plain motif to the back of it for thickness, so it doesn't really matter. In the new series, we will discover some shortcuts that can save you time and material, but also when not to use them.
Using Color B, begin with a magic circle.
Ch 1, sc cl (see pics) in circle. Tighten circle, bind off. Weave beg tail to the point.
To make a sc cl in the circle: (Insert hook, pull up a loop. Yarn over, pull through one loop) twice. Insert hook, pull up a loop (4 loops on hook).

Yarn over, pull through all four loops.

To complete the nose, bind off, tie tails in an overhand knot, tighten gently to a point.

For the next steps, I skip the needle and just use a crochet hook. You can choose to use either.
- Because my skills with a needle need improvement, it's easier for me to work my magic with a hook. Another part of the new series will teach you how to use multiple tools for the same technique, to find what you're most comfortable with.
Attach nose piece, point down, by pulling both tails to the back, through the chain-3 space of Round 3.

Insert the hook through the post space of the second stitch from center in Round One.
 |
Pull the thread up. You can pull it all the way through if you want, or just drop the loop for the next step.

Insert the hook through the corner space of the nose.

Pull the thread through.

Insert the hook through the next post space up in the same round.

Pull the thread through the post space to the back.

For Mouth:
Insert the hook from the front into the post space between sc2tog, and pull the thread through.

Insert the hook under the thread going through the chain-3 space, pull through, and then to the back through the chain-3 space.

Pull thread up to the front through the next post space. Insert the hook under the stitch made in the last step.

Pull the thread through the same post space to the back side again.

Repeat for the other side of the mouth. Before tying off ends, place your hook underneath the nose piece to keep the stitches from pulling.

Whiskers:
- Surprisingly, the whiskers of both motifs were the hardest part of this pattern for me. Although I have some studying to do myself before creating a tutorial for how to create facial details, size, shape, and placement will be some of the Design Series subjects. The size, depth and angle of your details can change the entire appearance of a pattern, so it's important to work these issues out before you design! #MouseHeart came to life when I added too many strands to the whiskers, which changed the shape of the nose, ruining the attempt at making a cat. The rounded eyes were already a bit off, then the large knot of double strands widened the nose too much. But, by leaving the whiskers a bit longer, the pattern easily became a mouse.
For both motifs, I simply used a few of the leftover thread scraps I had after the embroidery. Use pieces of thread at least 2 1/2" (6 cm) long.
#Catheart:
Use one piece of thread for each side (2 total).

Insert the hook under the thread at the top corner of the nose, double a piece of thread over and grab with the hook. Pull halfway through to create a loop.

With the hook through the loop, grab the tails of the strand with the hook.
Pull through as for fringe, tighten gently. Repeat for the other side.

Trim the strands of the whiskers to about 1/2" (1 cm).

#MouseHeart:
Use two pieces of thread for each side (4 total)
Holding both strands together, pull through exactly as for #CatHeart.

I left the strands for these whiskers 1" (2.5 cm) long. I think it's possible to trim them and still save this as a cat, if your embroidery skills are better than mine. I like the look of the 4 strands of whiskers, but the nose and eyes need to be different.
Finishing:
If you're using this motif as an applique, or your back looks nice and neat, you can skip this step. For those who would like to make an ornament or use for jewelry, and maybe the back of it looks so horribly bad that you won't even take a picture of it, you will need a second motif. Attach the second motif to the embroidered main piece with a whip stitch in the back loops.
Conclusion:
So, these have only been a few highlights for what's to come in the Design Series. Honestly, I'm still kicking the idea around a bit, because I'm undecided on how I should organize the series. I'm already working on what to create tutorials and tips for, but I need help choosing whether some skills should be separated from others. I welcome your opinions, so please help me think about it! -
At first, when you think of someone designing their own crochet patterns, you probably think of someone with advanced skills. But what's to say a beginner can't design a scarf with their own combination of single crochet, chain stitches, and a special choice of yarn?
Who's to say that a beginner shouldn't sit down and try to crochet a cute little character that their kid drew, like I did? If you have the ambition, and someone to teach you, you can learn anything! Once you learn how to make something as simple as a chain and slip stitch combination, you can begin to learn the basics of creating shapes.
I think that adding tutorials for some basic, easy skills and tips would be very helpful. But as an advanced crocheter, I also understand that tutorials for beginners can be redundant and boring, if you already know the skill. Should I separate the lessons for beginners into their own series? I'm afraid the more advanced tutorials will take on a snobby "you can't do this yet" feeling.
At the same time, I worry that combining information for beginners in an advanced tutorial will be too much information, and could get confusing. I considered creating the tutorials using as many tips as I can include with the subject, then highlighting different skill levels throughout the post. What skill level are you, and what do you think would be best?
Happy Crocheting!
Comments
Post a Comment
Spam sucks! Your comment will not be visible until approval. Please do not include links in your comment without permission. Thanks!